
Azure ML studio provides a platform to create Model and analyses accuracy of model. Experiment created in first hand is called "Training experiment". In ML studio once training experiment is completed it can be promoted to "Predictive experiment" with single click.
Training experiment is exposed as webService and available to be used by external world. Predictive experiment used webService input & output component along with trained model prepared in training experiment.
In this post we will create a training experiment using german.credit data set from UCI and promote this training experiment to predictive experiment using WebServices and access it via WebClient and Python utility program.
Create Training Experiment - German Credit Score Experiment
Download dataset CreditScore DataSet and upload german.data.csv in DataSet component of ML Studio. Once we have data in place we can create experiment with this dataset (appears under Saved Dataset -> My Dataset in experiment component).
Dataset "german.data.csv" is starting point of experiment, further we update metadata with column names and change some of column to categorical.
Split the data set (70% training data and 30% test data). Further we have used R script to remove biases in dataset. Once dataset is ready, we select two different model and train model with the dataset and finally evaluate it with Evaluate Model component. Below diagram shows training experiment flows:
If we observe we have used two different model for training and evaluated result using Evaluation model component. Two class Bayes point machine model gives better result as compare to linear regression.
Transform training experiment to Predictive experiment: Since we have two different model in place in training experiment so we have to select one model which we want to expose as service.
Select Two class Bayes Point Machine (as its accuracy is more) and click "Setup Web Service -> Predictive webService". It generates new condensed form of experiment(removing model training section) using trained model. Below diagrams shows Predictive experiment flow.
Once predictive experiment is generated, web-service is created for this experiment. API Key generated is important assets to access from external world.
Access predictive experiment WebService:
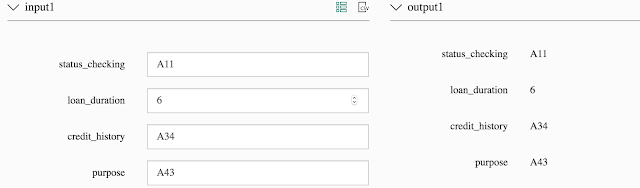
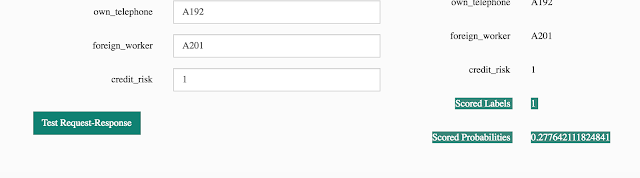
Using web-client: From dashboard of generated WebService, on click on test link it redirect to form where we can pass web-service input and get output. We have sample data which can be used to test the same. Below diagram shows output received by executing service exposed.
Using python utility: By default sample python utility generated by Azure ML studio. Click on Request/Response from API Help column and it redirect us to source code which will give access to WebService.
We need to pass sample input and correct API Key. Below is sample python code with updated input and API Key which gives response same as obtained via webClient.
Python sample utility:
Sample Output:- Save above sample as AzureMLWS.py and execute in terminal.
> python AzureMLWS.py
Note: Batch execution can also be achieved by passing multiple set of input in input section.
Training experiment is exposed as webService and available to be used by external world. Predictive experiment used webService input & output component along with trained model prepared in training experiment.
In this post we will create a training experiment using german.credit data set from UCI and promote this training experiment to predictive experiment using WebServices and access it via WebClient and Python utility program.
Create Training Experiment - German Credit Score Experiment
Download dataset CreditScore DataSet and upload german.data.csv in DataSet component of ML Studio. Once we have data in place we can create experiment with this dataset (appears under Saved Dataset -> My Dataset in experiment component).
Dataset "german.data.csv" is starting point of experiment, further we update metadata with column names and change some of column to categorical.
Split the data set (70% training data and 30% test data). Further we have used R script to remove biases in dataset. Once dataset is ready, we select two different model and train model with the dataset and finally evaluate it with Evaluate Model component. Below diagram shows training experiment flows:
 |
| Training experiment - Trained Linear regression and Two class Bayes point machine model |
Transform training experiment to Predictive experiment: Since we have two different model in place in training experiment so we have to select one model which we want to expose as service.
Select Two class Bayes Point Machine (as its accuracy is more) and click "Setup Web Service -> Predictive webService". It generates new condensed form of experiment(removing model training section) using trained model. Below diagrams shows Predictive experiment flow.
 |
| Predictive experiment with wrapper of webService input and output |
Access predictive experiment WebService:
Using web-client: From dashboard of generated WebService, on click on test link it redirect to form where we can pass web-service input and get output. We have sample data which can be used to test the same. Below diagram shows output received by executing service exposed.


Using python utility: By default sample python utility generated by Azure ML studio. Click on Request/Response from API Help column and it redirect us to source code which will give access to WebService.
We need to pass sample input and correct API Key. Below is sample python code with updated input and API Key which gives response same as obtained via webClient.
Python sample utility:
import urllib2
# If you are using Python 3+, import urllib instead of urllib2

import json


data =  {

        "Inputs": {

                "input1":
                {
                    "ColumnNames": ["status_checking", "loan_duration", "credit_history", "purpose", "credit_amount", "savings_amt", "emp_years", "percent_disp_income", "status_sex", "other_debts", "residence_since", "property", "age", "other_installments", "housing_status", "num_credits", "job_type", "num_dependant", "own_telephone", "foreign_worker", "credit_risk"],
                    "Values": [ [ "A11", "6" ,"A34", "A43","1169","A65", "A75", "4", "A93", "A101", "4" ,"A121" ,"67" ,"A143" ,"A152" ,"2", "A173", "1", "A192", "A201" ,"1"], ]
                },        },
            "GlobalParameters": {
}
    }

body = str.encode(json.dumps(data))

url = 'https://ussouthcentral.services.azureml.net/workspaces/3d855244528843e5b9eb1f30b2e1bfc2/services/d56ab818236d40a987952b892b6d2bb7/execute?api-version=2.0&details=true'
api_key = 'Mk3G+PTAsMAZqju7MVZUfNj8BBcWvLtUp3NocTrpsyo4y6g7kxcGCfNX7o/YCZUXVwr/dzwoTGhPHl7lyJEPGw==' # Replace this with the API key for the web service
headers = {'Content-Type':'application/json', 'Authorization':('Bearer '+ api_key)}

req = urllib2.Request(url, body, headers)

try:
    response = urllib2.urlopen(req)

    # If you are using Python 3+, replace urllib2 with urllib.request in the above code:
    # req = urllib.request.Request(url, body, headers)
    # response = urllib.request.urlopen(req)

    result = response.read()
    print(result)
except urllib2.HTTPError, error:
    print("The request failed with status code: " + str(error.code))

    # Print the headers - they include the requert ID and the timestamp, which are useful for debugging the failure
    print(error.info())

    print(json.loads(error.read()))
Sample Output:- Save above sample as AzureMLWS.py and execute in terminal.
> python AzureMLWS.py
 |
| Credit score webService Response |
Liên hệ Aivivu, đặt vé máy bay tham khảo
ReplyDeletekinh nghiệm mua vé máy bay đi Mỹ giá rẻ
vé máy bay hà nội sài gòn tháng 6
giá vé máy bay pacific airlines sài gòn hà nội
vé máy bay đi đà lạt vietjet
vé máy bay đi Huế bao nhiêu
thuê xe 16 chỗ đi sân bay nội bài
combo du lịch đà nẵng
This comment has been removed by the author.
ReplyDeleteNice Post! Thanks for sharing.
ReplyDeleterecruitment agency in gurgaon
recruitment agencies in noida
recruitment agency in delhi
580EDE05C8
ReplyDeletekiralık hacker
hacker arıyorum
kiralık hacker
hacker arıyorum
belek
Wow, what a great read! The insights here are so helpful. I'm definitely bookmarking this for future reference. Thanks for sharing!
ReplyDeleteOne Day Trip Places in Kerala