
In this post we will start with creating an GCP Virtual machine instance and create an express.js web application.

Prerequisite: Have a GCP account with billing enabled. Please refer how to get started with Google Cloud Platform account setup.
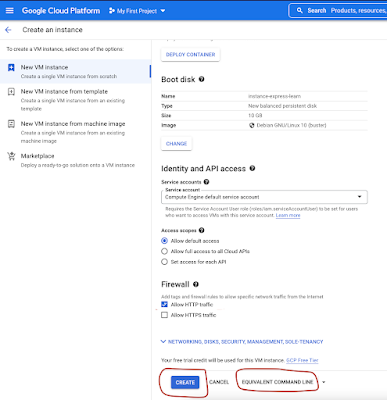
Lets open GCP console and create a VM instance. (If you are creating very first time then Google will enforce to enable Compute engine). It will take few seconds to complete and

Configure all the details to define your virtual machine: Click "Create Instance" and provide a valid name for VM. I have used "instance-express-learn". There are multiple ways to create VM(using predefined template, create custom template, etc), I am going ahead with default options of machine configuration.


Click "CREATE" or Copy command from "EQUIVALENT COMMAND LINE" (run command in Cloud shell) to create VM.
What is Google Cloud shell and Where you can find google Cloud shell?
- Ephemeral VM which offers a terminal on the browser.
- Click on Activate Cloud Shell ">". It will open session for executing commands.

Verify VM is running/listing of your VM instances:
- Green tick indicates that VM is successfully created and running.
- From cloud shell, run following command and list of all VM's running.When you connect to VMs using the Cloud Console, Compute Engine creates an ephemeral SSH key for you
n0r0082@m-c02z31rnlvdt ~ % gcloud compute instances list
NAME                    ZONE           MACHINE_TYPE  PREEMPTIBLE  INTERNAL_IP  EXTERNAL_IP     STATUS
instance-express-learn  us-central1-a  e2-medium                  10.128.0.2   34.123.1xx.2xx  RUNNING

We have a running virtual machine with adequate infrastructure spawned with just few clicks/commands. This summarize beautifully why Cloud is a buzzword :)
How to access GCP VM from local terminal
- Please refer Install the Google Cloud CLI / Cloud SDKs by language to setup gcloud locally.
- Once gcloud has been setup, we can login to GCP from terminal. First authenticate terminal session using following command. On prompt, click Allow and It will open web browser and enforce to login with an emailId (Use emailId which has been used to create GCP account)
n0r0082@m-c02z31rnlvdt ~ % gcloud auth login
Your browser has been opened to visit:

    https://accounts.google.com/o/oauth2/auth?response_type=code
           &client_id=VERY_BIG_STRING.....


You are now logged in as [nikhil*******@gmail.com].
Your current project is [None].  You can change this setting by running:
  $ gcloud config set project PROJECT_ID


Updates are available for some Cloud SDK components.  To install them,
please run:
  $ gcloud components update
- Once authenticated, close web browser or you can go to console.
- Set PROJET_ID as recommended by above command and Run command to list VM's and we will get same result as command ran from Cloud shell.
n0r0082@m-c02z31rnlvdt ~ % gcloud config set project named-magnet-342122
Updated property [core/project].
n0r0082@m-c02z31rnlvdt ~ %
n0r0082@m-c02z31rnlvdt ~ %
n0r0082@m-c02z31rnlvdt ~ % gcloud compute instances list
NAME                    ZONE           MACHINE_TYPE  PREEMPTIBLE  INTERNAL_IP  EXTERNAL_IP     STATUS
instance-express-learn  us-central1-a  e2-medium                  10.128.0.2   34.123.124.191  RUNNING
- What is PROJECT_ID value? - Fetch PROJECT_ID value from GCP Console. ID value is PROJECT_ID value.


Create express.js web-application in VM:
- Install node.js and update with latest versio{by default node is installed in VM}
nikhilranjan2712@cloudshell:~ (named-magnet-342122)$ node --version
v12.14.1

>>>Update node version with latest
nikhilranjan2712@cloudshell:~ (named-magnet-342122)$ nvm install stable
Downloading and installing node v17.6.0...
Downloading https://nodejs.org/dist/v17.6.0/node-v17.6.0-linux-x64.tar.xz...
###############################################.... 100.0%
Computing checksum with sha256sum
Checksums matched!
Now using node v17.6.0 (npm v8.5.1)
nikhilranjan2712@cloudshell:~ (named-magnet-342122)$ node --version
v17.6.0
- Set default to latest version
nikhilranjan2712@cloudshell:~ (named-magnet-342122)$ nvm alias default stable
default -> stable (-> v17.6.0)
- Install exress-generator and then using exress-generator create an app named "client-app"
nikhilranjan2712@cloudshell:~ (named-magnet-342122)$ npm install -g express-generator nikhilranjan2712@cloudshell:~ (named-magnet-342122)$ npm audit fix --force nikhilranjan2712@cloudshell:~ (named-magnet-342122)$ npm install -g express-generator create : client-app/ create : client-app/public/ create : client-app/public/javascripts/ create : client-app/public/images/ create : client-app/public/stylesheets/ create : client-app/public/stylesheets/style.css create : client-app/routes/ create : client-app/routes/index.js create : client-app/routes/users.js create : client-app/views/ create : client-app/views/error.jade create : client-app/views/index.jade create : client-app/views/layout.jade create : client-app/app.js create : client-app/package.json create : client-app/bin/ create : client-app/bin/www change directory: $ cd client-app install dependencies: $ npm install run the app: $ DEBUG=client-app:* npm start - Start app using following command
nikhilranjan2712@cloudshell:~/client-app (named-magnet-342122)$ DEBUG=client-app:* npm start

> client-app@0.0.0 start
> node ./bin/www

  client-app:server Listening on port 3000 +0ms
- Access application http://localhost:3000. Open a new console and access app using curl command.

-----====-----------
I read your blog now share great information here.
ReplyDeleteBobcat hire
I can't express enough how valuable Whizlabs has been in my pursuit of the Google Cloud Architect certification. The information provided on updated exam practice questions is not only accurate but also aligned with the latest industry trends. The training offered a structured learning path, and the online course was a treasure trove of knowledge. The hands-on labs were instrumental in honing my practical skills, making me feel more confident in implementing cloud architectures on GCP. Whizlabs' commitment to providing a holistic approach to certification is truly commendable.
ReplyDeletehttps://gardenersschool.com/calendula-the-cheerful-versatile-flower/
ReplyDeleteNice Blog!
ReplyDeleteToilet Bowl Cleaner Liquid, introducing our premium solution tailored for your household’s needs. Formulated to effortlessly tackle tough stains and germs, leaving your toilet sparkling clean and smelling fresh with every use. Say goodbye to grime and hello to a hygienic, inviting bathroom experience.
ReplyDeleteThis comment has been removed by the author.
ReplyDeleteMonkTaxSolutions is providing outsourced accounting services with tax preparations & payroll services, etc. Switch to an affordable accounting solution today. Our team will manage the whole process. Our team of professional bookkeepers and accountants provides the services that clients need, with our rates typically 50% less than the equivalent service. Speak to us today!
ReplyDeleteVisit - https://monktaxsolutions.com/
Getting started with Google Cloud Platform (GCP) involves creating a virtual machine (VM) instance via the GCP Console, configuring it with necessary resources, and then deploying and running your application on this instance. This process allows you to leverage GCP's robust infrastructure for scalable and reliable application hosting.
ReplyDeletePlz Visit my Website:- Door to Door Car Shipping Services
Check this outthatseazy
ReplyDeleteThis blog is an absolute gem! It's packed with valuable information and practical advice that can truly benefit people. wavesprinter
ReplyDeleteYour blog has quickly become one of my favorites. The depth and quality of your content are truly impressive. Looking forward to your next post! plan to visit - team outing venues in Jhajjar,
ReplyDeletepratapgarh farms and resorts in Jhajjar
is best place for day event near delhi.
Kpop4d merupakan link situs slot gacor gampang menang yang sudah mendapat legalisir dari lembaga judi Internasional.
ReplyDeleteExcited to learn more about Google Cloud Platform's virtual machines and running applications? This article is a great starting point! Looking forward to diving in and exploring the possibilities.
ReplyDeleteYour blog is packed with valuable information. Thankyou!!!
ReplyDeleteI enjoyed reading your blog article. I'm grateful that you shared.
ReplyDeleteThis article is a great starting point! Looking forward to diving in and exploring the possibilities.
ReplyDeleteExtremely appreciated. Thanx for being here.
ReplyDeleteThe Hayati Pro Ultra is priced at £8.98 for a single unit, with discounts available for bulk purchases. It aims to provide a blend of convenience, style, and long-lasting performance for vaping enthusiasts.
ReplyDeleteFor more details, you can visit the
OrderVape website.
Thank you for this information and putting some pictures that helps us understand the topic. I'm glad I encountered your informative blog content. If you want to play games while earning as well, you may try and visit my blog to know how: https://pinaskohan.com/maswerte/
ReplyDeleteThank you for providing such a detailed and insightful article. It's incredibly helpful and offers valuable information that I can easily apply. Great Job!
ReplyDeletehttps://pinaskohan.com/phbet-casino-online/
foyajp login
ReplyDeleteGetting started with Google Cloud Platform (GCP) is straightforward. First, create a GCP account and navigate to the Compute Engine section to set up a virtual machine (VM). Choose your desired configuration and operating system, then deploy the VM instance. Once your VM is running, you can SSH into the instance and install the necessary software to run your application. For those balancing tech projects with academic commitments, consider utilizing dissertation writing services to ensure you stay on top of your studies while exploring GCP.
ReplyDeleteNice Blog, its really help to our projects . looking forward to more blog like this. thankyou
ReplyDeleteStarting with Google Cloud Platform's virtual machines is straightforward and powerful. By creating a VM instance through the GCP console or command line, you can quickly define configurations and launch within seconds. The Cloud Shell provides an ephemeral VM terminal accessible directly from your browser, simplifying command execution and management. Once set up, accessing VMs from your local terminal involves installing the Cloud SDK, authenticating, and using commands like gcloud to interact seamlessly. It's a robust platform for deploying applications like an express.js web-app, leveraging cloud infrastructure effortlessly."
ReplyDeleteISO Certification in iraq
I appreciate you sharing this kind of content. I am a blogger and I do contents about earning gaming apps. If you're interested to know about it, you may visit my blog by clicking my profile name.
ReplyDeleteAT thechickenfarmers
ReplyDeleteWe provide
BEST HENS
Our hens are bred for their impressive egg-laying capabilities. They consistently deliver a high volume of eggs, ensuring a reliable and abundant supply for your needs.
EGGS
We prioritize the quality of the eggs our hens produce. You can expect eggs with vibrant yolks, excellent taste, and optimal nutritional value, making them perfect for both culinary delights and nutritious meals.
Visit our websitehttps://thechickenfarmers.com/
https://thechickenfarmers.com/
Natural and Sustainable Farming
you can be confident that you are getting poultry products that are free from added hormones and antibiotics. We prioritize natural and sustainable farming methods, allowing our birds to roam freely in spacious, clean environments and providing them with a balanced diet to promote their overall health.
If the dog continues toward the boundary, the collar delivers a mild static correction, encouraging the dog to retreat click here. Over time, dogs learn to associate the warning beep with the static correction and avoid the boundary. This training process is crucial for the system's success and typically involves positive reinforcement techniques.
ReplyDeleteThank you for the clear and insightful writing. I really appreciate it! also visit my website
ReplyDeleteThank you for the invaluable information you provide. Your blog is a beacon of knowledge.
ReplyDeleteI always find your posts to be so enlightening and full of useful information. Your blog is an incredible resource.
ReplyDeleteThis comment has been removed by the author.
ReplyDeleteThank you for sharing your thoughts! 🌟
ReplyDeleteFor those seeking the ultimate comfort upgrade, look no further than our Best Car Seat Cushionand Office Chair. Engineered for superior support and pressure relief, this cushion transforms long drives and extended office hours into more comfortable experiences. Its gel-infused design molds to your body, ensuring a cool and comfortable seating experience. Plus, it's versatile and portable, allowing you to bring comfort with you wherever you go!
Learn more about our gel seat cushions - https://econour.com/collections/best-seat-cushion
See how businesses like yours successfully implemented DMARC and improved security.
ReplyDeleteI am Assignment helper working as an assignment helper in Workingment. Our team providing support and guidance their acadmeic success. Every students are worried about who Do My Assignment.
ReplyDelete
ReplyDeleteYou can read more articles on the topic of opportunities to become a little richer and more productive in online business!
The information you shared is incredibly helpful and very beneficial for those who need it, like me. The Best Travel Agency in Dhaka
ReplyDeletePromoedge is a leading media Production House In Delhi, renowned for its innovative approach and high-quality production services. Specializing in a wide range of media solutions, including corporate films, commercials, digital content, and event coverage, Promoedge combines cutting-edge technology with creative expertise to deliver compelling visual experiences.
ReplyDeleteUltron services Calgary - secondary backyard suite in Calgary - backyard suite construction - flat roofing repair in Airdried - airdried roofing experts - airdried roof replacement.
ReplyDeleteThank you for the excellent blog post on this topic. organizers for car keeps your vehicle tidy by providing compartments for storing various items securely. Check this for more information about car sunshades: https://econour.com/collections/car-organizers
ReplyDeleteThank for sharing the blog post on this topic. A car cushion seat enhances comfort during long drives by providing extra support and reducing pressure on your back and hips. It also helps improve your driving posture, making every journey more enjoyable. Check more about car seat cushion – https://econour.com/collections/best-seat-cushion
ReplyDeleteGreat Blog ! Car window sun shade is an excellent solution for protecting your vehicle's interior from harmful UV rays while keeping it cool. They also offer added privacy and minimize glare, enhancing your overall driving experience. Check out more about car side window sunshades - https://econour.com/collections/car-side-window-sun-shades
ReplyDeleteDiscover the advantages of using a Mutual fund distributor platform to streamline your investment processes. This innovative platform offers a user-friendly interface, real-time data, and comprehensive tools to manage your mutual fund investments efficiently. Enhance your financial portfolio and make informed decisions with ease.
ReplyDeleteStreamline your financial processes with our top-notch General ledger reconciliation solution. Our platform ensures accurate and efficient reconciliation, helping you maintain financial integrity. Trust our solution to minimize errors and save valuable time for your finance team.
ReplyDeleteLooking for quick access to funds? Our Digital loan against mutual funds offers a seamless way to leverage your investments. With minimal paperwork and instant approvals, you can secure a loan without liquidating your assets. Experience the convenience and speed of our digital platform today!
ReplyDeleteLooking for a reliable Online mutual fund investment portal? Look no further! Our platform offers an intuitive, secure, and efficient way to invest in mutual funds. Access expert advice, real-time data, and personalized investment options to maximize your returns. Join our growing community of savvy investors and start building your wealth today with our premier online mutual fund investment portal.
ReplyDeleteOptimize your financial analysis with a financial data Aggregator that brings together data from multiple sources. Gain valuable insights and make informed decisions with ease. Enhance your financial planning and reporting capabilities today.
ReplyDeleteDiscover the ultimate retreat at luxury spa resorts in coorg. These havens of peace provide top-notch spa treatments, exquisite dining options, and luxurious rooms with breathtaking views. Pamper yourself with therapeutic massages, detoxifying rituals, and wellness programs designed to refresh your mind, body, and soul. Coorg's pristine beauty and serene environment make it the perfect getaway.
ReplyDeleteMaximize your Instagram performance with our Instagram engagement calculator. This easy-to-use tool evaluates the effectiveness of your posts, offering valuable data on interactions. Optimize your social media efforts by understanding what resonates with your followers.
ReplyDeleteDiscover the elegance of a Personalized stamp by Stamplified. Ideal for branding, personalizing stationery, or creating custom gifts, these high-quality stamps are designed to reflect your unique style. Easy to order and quick to deliver, Stamplified ensures your stamp meets all your expectations. Order now for a touch of personalization.
ReplyDeleteGreat guide! Ever thought about how this could streamline metadata management across large projects?
ReplyDeleteford repair dubai
Any tips for making glitter liner last all day?
ReplyDeleteA Certificate IV in Information Technology is an excellent way to build foundational skills in IT. It equips you with practical knowledge in areas like networking, programming, and cybersecurity, making it a great starting point for a career in the tech industry. If you're looking to boost your credentials and advance your IT career, this qualification is a smart choice.
ReplyDeleteA Certificate IV in Information Technology is an excellent way to build foundational skills in IT. It equips you with practical knowledge in areas like networking, programming, and cybersecurity, making it a great starting point for a career in the tech industry. If you're looking to boost your credentials and advance your IT career, this qualification is a smart choice.
ReplyDeletehttps://tower.edu.au/certificate-iv-it/
A Certificate IV in Information Technology is an excellent way to build foundational skills in IT. It equips you with practical knowledge in areas like networking, programming, and cybersecurity, making it a great starting point for a career in the tech industry. If you're looking to boost your credentials and advance your IT career, this qualification is a smart choice.
ReplyDeletetower.edu.au/certificate-iv-it
A information technology cert is an excellent way to build foundational skills in IT. It equips you with practical knowledge in areas like networking, programming, and cybersecurity, making it a great starting point for a career in the tech industry. If you're looking to boost your credentials and advance your IT career, this qualification is a smart choice.
ReplyDeleteAn IT Job Ready Program is an essential stepping stone for anyone looking to break into the tech industry. These programs offer hands-on experience, real-world projects, and industry certifications, giving you the skills and confidence needed to secure a job in IT. If you're serious about jumpstarting your tech career, this program is a must-consider option.
ReplyDeleteEarning your CCNA Certification is a powerful way to boost your career in networking. This certification validates your skills in routing, switching, and network security, making you a valuable asset to employers. Whether you're just starting or looking to advance in IT, CCNA accreditation opens up numerous opportunities in the tech industry. Consider it a smart career move!
ReplyDeleteObtaining the ISTQB Foundation certification is a crucial step for anyone pursuing a career in software testing. This globally recognized qualification demonstrates your understanding of fundamental testing principles and best practices. Whether you're new to the field or looking to formalize your skills, the ISTQB Foundation is an excellent way to enhance your credibility and open doors to more opportunities in software testing.
ReplyDeleteLooking for the ? Choosing the right agency can make all the difference in your online success. A top agency will offer tailored strategies, expert SEO, and creative content that drive real results. For businesses aiming to boost their online presence and achieve growth, partnering with the best digital marketing agency in Perth is a smart move.
ReplyDeleteLooking for the best digital marketing agency in Perth? Choosing the right agency can make all the difference in your online success. A top agency will offer tailored strategies, expert SEO, and creative content that drive real results. For businesses aiming to boost their online presence and achieve growth, partnering with the best digital marketing agency in Perth is a smart move.
ReplyDeleteLove the website!
ReplyDeleteVery content
ReplyDeleteSlot Gacor Hari Ini Dan Slot Online Dengan Uang Asli bom89.
ReplyDeleteDr. Tamara Sachs has focused exclusively on a comprehensive, holistic, personalized approach to uncover the root causes of chronic illness, accelerated aging, and general lack of vitality since 2003.
ReplyDeleteUpload your gameplays, select your AI actors, test different hooks, formats and more in minutes to find a top performer.
ReplyDeleteBuild your relation with the God stronger than ever with the help of online Quran classes. We are here to give you top quality lessons
ReplyDeleteA Mike Holmes home inspection provides potential buyers and sellers in Calgary with an precise and unbiased third-party assessment of the condition of the house they are planning to sell or buy.
ReplyDeleteNeed assistance? Nadra Card UK delivers easy fixes and reliable support.
ReplyDeleteHome Clear offers fast, friendly, and affordable house, garage, shed, office, and probate clearance services in Newbury and the Berkshire area. We cover Newbury, Thatcham, Hungerford, and all surrounding areas.
ReplyDeleteGreat post! The information you shared is both helpful and practical. I appreciate your efforts in making this topic understandable.
ReplyDeleteExperience the power of a pumice stone to naturally lift away dirt and stains without the need for harsh chemicals.
ReplyDeleteExcellent content! Your perspective really helped me
ReplyDeleteA must-read! The content is both engaging and highly educational. Thanks for providing such value.
ReplyDeleteI’m absolutely thrilled to share my excitement about SEVlaser after reading the wonderful comments here. Just like how one might celebrate a special event, such as a birthday, with a thoughtful gift, I found reserving time for SEVlaser as a gift to myself was truly delightful. It’s been a fantastic experience, and I’m so happy to join the many others who’ve had great results. For anyone considering, check out their exceptional service at Laser Hair Removal in Atlanta
ReplyDeleteAmazing post! I found your perspective on this issue very compelling. Your writing always leaves me with something to think about.
ReplyDeleteThanks for this insightful blog! The clarity in your explanation makes complex topics easy to understand. Keep up the great work!
ReplyDeleteI understand your perspective from your comments. I admire his approach for giving readers a unique outlook. To learn more about our challenges of estimating duct takeoff, please contact us. We are committed to catering to the needs of your home.
ReplyDeleteYour writing is innovative, challenging norms, and offers a unique perspective. I offer Affordable Plumbing Company to complement your work and engage readers.
ReplyDelete"Thank you for this thought-provoking article. I truly appreciate the thoroughness and effort you put into researching and presenting the topic."
ReplyDeleteGreat post! I really enjoyed your insights on this topic. Keep up the excellent work! Inventory control system
ReplyDeleteThe DNT ThermNight LRF Thermal & Night Vision Multispectral Scope TNC225R is the pinnacle of advanced optics technology, combining cutting-edge thermal imaging with high-definition digital night vision.
ReplyDeleteYour post was incredibly helpful and informative. Thank you for taking the time to share your knowledge with us!
ReplyDelete"Thank you for offering a fresh perspective on this topic. Your insights are always appreciated."
ReplyDeleteThis comment has been removed by the author.
ReplyDeleteThanks for your valuable input! His creative viewpoint truly adds a new dynamic to this topic. If you'd like to see how Choose Right accuracy of Commercial Estimation Services can bring your ideas to life, contact us today. We are committed to crafting customized plans to meet your specific home needs.
ReplyDeleteGreat article! His approach is indeed a game-changer. If you're considering construction, choosing Right Commercial Estimating before starting can make all the difference. Reach out to us for custom solutions that fit your specific requirements.
ReplyDeleteA Mike Holmes home inspection offers potential buyers and sellers in Toronto and the GTA an accurate and impartial evaluation of the condition of the house they are considering.
ReplyDeleteYour post was timely and informative. I appreciate the effort you put into it!
ReplyDeleteiforgot.apple.com
"I appreciate the thoroughness of this post. Thank you for diving deep into this topic!"
ReplyDeleteThanks for including the conversion formula in this post! Now I know that – simple and effective! for info 10 mm to Inches
ReplyDeleteLoved this detailed post on PPC campaigns! The section on ad targeting was particularly useful. We’ve seen a rise in conversion rates using these tactics at BlueLinks.for more info Seo Company Dallas Texas
ReplyDeleteWonderful post! It's fascinating to see how much there is to know about Grow Your Construction Estimating Firm. If you need further guidance on choosing the right service, feel free to reach out. We're here to assist with all your estimating needs.
ReplyDeleteYour comments are insightful. His style stands out because it offers a distinct viewpoint. Get in touch with us to learn more about Calculate the Average Construction Cost. We promise to cater to your home’s needs.
ReplyDeleteThanks for the detailed explanation. Such a useful read! Thank you for your knowledge.SEO Company UK
ReplyDeleteAt Creative Scope, we specialize in creating premium websites tailored to the unique needs of businesses in Toronto and the Greater Toronto Area (GTA).
ReplyDeleteThanks for the valuable addition; it offers a great perspective.
ReplyDeleteI appreciate the effort you put into researching and writing this post. It was very informative
ReplyDeleteGoogle Cloud Platform makes it easy to get started with a virtual machine. You can deploy applications swiftly in a VM instance, ensuring high performance. For Amazon product photography, precision and lighting are key!
ReplyDeleteAt Cytotec Ventas, we are dedicated to providing accurate information about reproductive health. With expertise in medications like Cytotec and mifepristone, we empower individuals with trustworthy guidance.
ReplyDeleteAt Cytotec Sales Guatemala, we are dedicated to providing accurate information about reproductive health. With expertise in medications like Cytotec and mifepristone, we empower individuals with trustworthy guidance.
ReplyDeleteWelcome to MisoGuate, your trusted source for safe and confidential access to medications to effectively terminate pregnancy. We are committed to providing women with a safe and quality option to take control of their reproductive health.
ReplyDeleteThank you for sharing such a well-rounded and informative post. Your expertise really shines through!"
ReplyDeleteScore Amazing Savings with Couponsbuyer. Browse through our updated collection of coupon codes and promo codes to get fantastic discounts on your top brands and retailers.
ReplyDeleteThe Raz DC25000 is a high-capacity disposable vape offering an impressive 25,000 puffs. It features a sleek design and delivers consistent, flavorful hits with each puff.
ReplyDeleteTo have the seamless mandatory documents like Nadra Card Renewal UK Nadra Card Centre is there for you
ReplyDeleteNice Post!
ReplyDeletePython training | React js training | PHP training | Graphic design training | Web design course | Internship for mca | Mern stack course | Mean Stack course | Data Analytics course | Artificial intelligence course
This comment has been removed by the author.
ReplyDelete
ReplyDelete"I appreciate your effort in crafting a post that is not only insightful but also very well-organized."
Choosing a wedding limo service atlanta elevates your wedding experience, providing a luxurious atmosphere that adds to the celebration. Make your special day even more memorable with a stylish ride that reflects your personal taste and sets the tone for an unforgettable celebration.
ReplyDelete
ReplyDelete"Thank you for shedding light on this topic. Your in-depth analysis has clarified many complex aspects."
Teen patti master old version provides a nostalgic take on the classic card game, featuring familiar gameplay and traditional rules. Players can reconnect with the basics of Teen Patti, enjoying its simple mechanics and engaging multiplayer options. Ideal for those who appreciate the roots of the game, this version allows you to enjoy classic card play with friends and family. Download it for a timeless gaming experience!
ReplyDeleteA commercial real estate consultant consultant specializes in providing expert advice and services to businesses and investors in the commercial property sector. These professionals assist clients with market analysis, site selection, property valuation, and investment strategies. They also offer guidance on leasing negotiations, zoning regulations, and property management solutions. By leveraging their extensive knowledge of local markets and trends, commercial real estate consultants help clients make informed decisions that align with their business objectives. Whether navigating a complex acquisition or optimizing an existing portfolio, these consultants play a crucial role in maximizing value and ensuring successful outcomes in commercial real estate transactions.
ReplyDeleteI love how Thothub combines tech, business, and fashion into one resource. It's always a great read. ThotHub
ReplyDeleteThanks for your clear and concise explanations. This was very helpful.
ReplyDeleteCheck Out This Site.
ReplyDeleteAl Fakher 15000 Puffs – Enjoy the well-known shisha flavors of Al Fakher with 15000 puffs for pretty much puffing without end. al fakher 15000 puffs
ReplyDeleteQuickly this site might irrefutably become well-known among most blogging and site-building people, because of the persistent posts as well as critiques. elf bar 10000 puffs
ReplyDeleteReally impressed by this AI chatbot! It’s amazing how it understands context so well and responds naturally. It makes customer support so much faster and easier, especially since there’s no need for users to sign up. for more Chatbot online
ReplyDeleteMany people target you should distinct foot work a long time before writing. Are going to be probable for you to additional desired short article in doing this. Podsalt go 2500 puffs
ReplyDeleteThis particular appears completely ideal. Each one of these small particulars are created along with large amount of history understanding. I love this a great deal land freight companies in uae
ReplyDeleteI found this to be an absolute treasure trove of knowledge. It’s clear you’ve poured your heart into this, and I’m so grateful for the time and effort you invest in helping your readers.
ReplyDeleteIslamic Gifts
ReplyDeleteThis post is just what I needed. Your tips combined with 123 hp com setup made the entire process of configuring my new printer hassle-free. Thank you!
Arabic Series ایک زبردست پلیٹ فارم ہے جہاں آپ کو بہترین عربی سیریز دیکھنے کو ملتی ہیں۔ یہاں کلاسک سے لے کر جدید کہانیوں تک، ہر قسم کے ڈرامے موجود ہیں جو آپ کو تفریح کے ساتھ عربی ثقافت کے قریب لے آتے ہیں۔ اپنے پسندیدہ لمحات کو دریافت کریں صرف "Arabic Series" پر! مسلسلات عربي
ReplyDelete
ReplyDeleteThank you for sharing such valuable insights! This blog has been so helpful in improving my DIY skills. I also wanted to mention that Home Depot offers a great opportunity to provide feedback through their survey at homedepot.com/survey. It’s a fantastic way to share your experience and contribute!
Your insights are always on point. Thanks for sharing another valuable post!
ReplyDeleteI’m bookmarking this so I can reference it later. Excellent tips!
ReplyDeleteSuch a well-written and informative post! I’ve learned so much, and I’m sure it will have a lasting impact on how I approach this topic.
ReplyDeleteExplore the refreshing world of Skruf Nicopods. Offering high-quality, tobacco-free pouches, Skruf provides clean and enjoyable nicotine delivery. Find your preferred flavor and strength at Skruf Snus.
ReplyDeleteFor a bold and satisfying nicotine experience, try 50 mg snus. These pouches combine premium strength with delicious flavors. Perfect for seasoned users, explore the range today and find your ideal product.
ReplyDeleteThis is one of the most well-written blog posts I’ve ever come across.
ReplyDeleteAmazing content, thank you! If you’re looking to share your thoughts on McDonald's, their McDVoice.com survey is definitely worth checking out.
ReplyDeleteIt is truly a well-researched content and excellent wording. I got so engaged in this material that I couldn’t wait reading. I am impressed with your work and skill. Thanks. squarespace website design
ReplyDeleteAnother amazing blog post – thank you for being so consistent! If you love Culver’s, be sure to visit tellculvers.com/survey to let them know how they’re doing.
ReplyDelete
ReplyDeleteThis deserves more attention.
This is such a great read! Thank you for putting this together. I recently found portalofficecom, and it’s been a great complement to posts like yours.
ReplyDeleteThis post was exactly what I needed to read today. Your ability to provide practical advice while maintaining a conversational tone is a rare skill. The examples you included really helped bring the concepts to life, making it easier for me to understand and apply them. Thank you for consistently delivering content that makes a difference. Medical Certificate
ReplyDeleteAt From The Heart Home Care, we specialize in providing exceptional in-home care for seniors/elderly near Columbia, SC. With our compassionate team of caregivers, your loved ones will receive the support and assistance they need to maintain their independence and well-being.
ReplyDeleteThank you for providing the information. Visit our location to learn more about Lost Mary Flavors.
ReplyDeleteWe are committed to providing round-the-clock services to cater to your transportation needs anytime, anywhere.
ReplyDeleteAt Book Your Wheels, we bring you an exquisite collection of luxury cars designed to elevate every journey. Catering to business professionals, vacationers, and those who crave the finer things in life, we redefine premium car rental services across India. Imagine arriving at your destination in a Lamborghini or Tesla, leaving a lasting impression that speaks volumes. Our hassle-free booking process, impeccable customer support, and flexible rental plans ensure an experience as smooth as the ride itself. With a fleet of the world’s most sought-after vehicles, we are committed to delivering excellence at every turn. Don’t just dream of driving luxury – make it a reality. Connect with us today at Book Your Wheels and turn every mile into a masterpiece.
ReplyDeleteCheck Out This Site.
ReplyDeleteQuickly this particular site may irrefutably gain popularity in between just about all running a blog as well as site-building people, in order to it's diligent articles or maybe evaluations. section 8 karim
ReplyDeleteDavid Reno is a leading home renovation service provider, fueled by an experienced team who will work with you from start to the completion of your remodeling or renovation project.
ReplyDeleteSee EUROPESNUS Best Deals today.
ReplyDeleteDon't miss Best Snus Deals of the season.
ReplyDelete
ReplyDeleteGreat tips! I’ve been looking for a way to streamline my TV setup, and your guide helped me discover tv.youtube.com/start. Thanks for the valuable info!
This is certainly what is more a fairly superior blog post that many of us without doubt adored measuring. Not likely each and every day which unfortunately utilize the prospects to get yourself a system.
ReplyDeleteSki Transfers from Zurich Airport
This type of looks entirely finest. These tiny details are usually made along with a lot of foundation details. I prefer in which a lot. Hair transplant london
ReplyDeleteThat's why it is best that you relevant researching previously penning. You're able to construct more desirable put up this way. Ptbola
ReplyDeleteI couldn’t stop reading this article! It’s brimming with sharp insights and fresh perspectives, offering so much value in one place
ReplyDelete
ReplyDeleteThis article was a goldmine of knowledge! Every point was compelling and packed with clarity and depth. Highly recommend giving it a read
What an outstanding article! It’s both thought-provoking and deeply informative. This is one I’ll keep coming back to time and time again.
ReplyDeleteI’m completely amazed by this article! It’s filled with eye-opening ideas and actionable advice. A must-read that I’ll revisit for sure.
ReplyDeleteThis article is an absolute gem! It’s packed with thought-provoking insights and actionable lessons. I’ll be revisiting it often.
ReplyDeleteYour wedding day is a once-in-a-lifetime celebration of love, joy, and new beginnings. At Affix Bridal, we’re here to make sure you walk down the aisle in a gown that reflects your beauty, style, and individuality.
ReplyDeleteHello, you used to write excellent, but the last several posts have been kinda boring?K I miss your tremendous writings. Past few posts are just a little bit out of track! come on! BLVK NICOTINE SALT
ReplyDeleteThanks for making the effort to go over this particular, Personally i think highly about this as well as adore understanding more on this topic. If at all possible, as you gain knowledge, would you mind updating your blog with more info? It is very helpful for me personally. Crown bar 15000 puffs
ReplyDelete
ReplyDeleteThank you for writing this informative post! By the way, if you've recently dined at McDonald's, taking the mcdvoice.com survey is a fantastic way to share your feedback and get rewards.
Embed site-wide savings using various Europesnus Discount Code options.
ReplyDeleteThis article gave me a fresh perspective on the subject! Your actionable tips and examples are exactly what I needed. I’m excited to implement them moving forward. Appreciate you sharing this knowledge!
ReplyDeleteعام 2025 سيكون مليئاً بالأعمال الدرامية التي تقدم سرداً جديداً للشخصيات والأحداث. ستظهر مسلسلات 2025 من مختلف البلدان العربية والعالمية، وستستعرض قضايا اجتماعية، تاريخية وثقافية، حيث يُتوقع أن تحقق نجاحات ضخمة بين المشاهدين على منصات البث المختلفة. مسلسلات 2025
ReplyDeleteProper air sealing is a critical step in creating energy-efficient homes and buildings. By sealing gaps, cracks, and openings in the building envelope, you reduce unwanted air leakage, which can lead to energy waste, higher utility costs, and poor indoor air quality.
ReplyDeleteI admire the way you consistently provide high-quality, insightful content. This article was another example of your ability to make learning engaging and informative. Your passion for writing and educating others shines through in every post. I truly appreciate the time and effort you dedicate to creating such valuable content. Keep up the amazing work. Private Dentist Birmingham
ReplyDeleteYour dedication to sharing well-researched and meaningful content is truly commendable. This post was insightful and thought-provoking, offering a fresh perspective on the topic. I appreciate the time and effort you invest in ensuring your content is valuable to your readers. Keep up the fantastic work. Australian Medical Certificate
ReplyDeleteHello, Neat post. There’s an issue together with your website in web explorer, might check this? IE still is the marketplace leader and a huge component to folks will omit your great writing because of this problem. kargototo
ReplyDeleteA referral code
ReplyDeleteis a special code given to users to share with friends and family. When someone joins using this code, both parties may receive rewards like discounts, bonus credits, or cashback. Many apps and websites, such as food delivery, shopping, and finance platforms, offer referral programs to attract more users. Companies benefit by gaining new customers without spending heavily on ads. Users enjoy perks by simply sharing their code. To use a referral code, enter it during registration or payment. It's a win-win system where both the referrer and the new user gain exciting benefits!
Informative read! It’s always valuable to see discussions on essential security measures. Access control in Los Angeles is a crucial part of protecting businesses and properties, ensuring only authorized individuals can enter. It’s great to see more focus on solutions that enhance safety and efficiency. Access control in Los Angeles.
ReplyDeleteFounded in 2019, Grow Jungles emerged from a deep-rooted commitment to conservation that prioritizes tangible, on-the-ground impact.
ReplyDeleteHERS Rating Company specializes in providing comprehensive home energy rating services using HERS Rating Company, the industry-standard software used to rate 1 in 4 new homes built in the United States.
ReplyDeleteAniday is a leading platform providing Headhunting service and Employer of Record (EOR) services across Asia. With over 5,000 clients and a network of more than 40,000 professional headhunters, Aniday delivers comprehensive recruitment solutions, helping businesses efficiently find and manage top talent globally.
ReplyDeleteThanks for sharing such useful content! Digital marketing for the home repair industry is truly a game-changer, helping businesses reach more local customers. I appreciate the tips and strategies mentioned — very helpful for service-based companies. Looking forward to more insights!
ReplyDeletehttps://www.bluelinks.agency/industries/home-repair/
The Pulsar Thermion 2 LRF XL60 redefines thermal performance, combining a cutting-edge thermal sensor with advanced features for extreme precision and clarity. Equipped with a highly sensitive 1024×768, 12µm, <35mK NETD sensor and a premium 60mm Germanium objective lens, the Thermion 2 LRF XL60 offers unrivaled thermal detection at distances up to 2800 meters.
ReplyDeleteEndurance ED spotting scopes provide the performance to get close to the action and the durability you demand. All magnifications are constructed with ED glass reducing the potential for chromatic aberration.
ReplyDeleteThis is such an engaging read, and I really appreciate the thoughtfulness and effort behind it! Your insights are not only informative but also thought-provoking. It's clear you put a lot of work into crafting this, and I’m sure many others will find it just as valuable. Keep sharing your amazing work – looking forward to more! Also, take time to read our article about Best Home Surveillance System.
ReplyDeleteWelcome to The Sacred Sparkle, where jewelry isn’t just an accessory—it is an expression of spirituality, individuality, and positivity. Each piece is handcrafted with love using high-quality metals, gemstones, crystals, resin charms, and more.
ReplyDeleteA needle stick injury occurs when a sharp object, such as a needle or syringe, accidentally punctures the skin. These injuries are most common in healthcare settings, where workers frequently handle medical needles, but they can also occur in other environments such as laboratories, waste management, and cleaning services.
ReplyDeleteYour passion for sharing knowledge truly shines through in your writing.دانلود نرم افزار جت بت
ReplyDeleteKingsTech Mini PC offre una selezione premium di mini PC ad alte prestazioni, progettati per efficienza, potenza e praticità compatta.
ReplyDeletehttps://www.pinterest.com/spacesandplaces321/
ReplyDeletePinterest
ReplyDeletePinterest
ReplyDeletePinterest
ReplyDeletePinterest
ReplyDeleteAt Unapologetically You, I believe that every individual deserves a safe and supportive space to heal, grow, and embrace their authentic self. Whether you are struggling with anxiety, depression, trauma, grief, life transitions, or other mental health challenges, I am here to guide you toward healing.
ReplyDeleteThe way you break things down is both insightful and empowering. Milford bounce houses
ReplyDeleteAt iTrade, we specialize in professional, eco-friendly house clearance services throughout Norfolk, covering Cromer, Stalham, Sheringham, Aylsham, Wroxham, Norwich, and surrounding areas.
ReplyDeleteAt HERS Rating Specialist, we provide professional and certified HERS energy ratings to help homeowners, builders, and architects improve energy efficiency, meet code compliance, and increase property value.
ReplyDeleteAt HERS Rating Company, we specialize in energy efficiency consulting and code compliance for residential and commercial buildings.
ReplyDeleteYou’re really outout here living your best life
ReplyDeleteYour growth is inspiringinspiring
ReplyDeleteJust wow. Keep goinggoing, you’re on fire
ReplyDeleteCome and experience the very best sporting and entertainment that the UK has to offer.
ReplyDeleteA needle stick injury occurs when a sharp object, such as a needle or syringe, accidentally punctures the skin.
ReplyDeleteWe are committed to providing round-the-clock services to cater to your transportation needs anytime, anywhere.
ReplyDeleteWe offer a full range of personalized services and self-paced courses tailored for pre-PA applicants, current PA students, and PA graduates.
ReplyDeleteWelcome to David Reno Basement Renovations Mississauga — where we transform basements into beautiful, functional, and inviting spaces.
ReplyDeleteOur "Sweet Memories Vintage Tee" designs are created and designed exclusively by small-town; woman-owned business, founded in Youngstown, OH in 2020.
ReplyDeleteThank you so much! Your guide helped me install TurboTax on Mac without any hiccups. Looking forward to reading more of your tech tips!
ReplyDeleteRead More=https://www.tumblr.com/katherinetaylor8/782406716091498497/how-do-i-install-turbotax-on-my-computer?source=share
https://penzu.com/journals/32718983/107080823
https://ext-6762086.livejournal.com/474.html?newpost=1
https://katherinetaylor8.stck.me/story/987950/Is-It-Safe-to-Install-TurboTax-from-the-Internet
https://katherinetaylor8.hashnode.dev/how-long-does-it-take-to-install-turbotax
https://sites.google.com/view/installturbotaxlicence/home
http://installturbotaxcom.parsiblog.com/
https://katherinetaylor8.art.blog/2025/05/02/why-is-my-turbotax-installation-stuck/
https://www.quora.com/profile/Katherine-Taylor-495/What-Should-I-Do-if-TurboTax-Won-t-Install-If-youre-trying-to-file-your-taxes-but-hit-a-roadblock-because-TurboTax-wo
The Zeiss Conquest HDX 10×42 binoculars are built to provide a high level of versatility, offering the largest field of view in their class—115 meters at 1,000 meters.
ReplyDeleteThere’s a level of integrity in your writing that stands out. 現金網
ReplyDelete