
What is Kubernetes?
Kubernetes is an open-source software system that allows you to easily deploy
and manage containerized applications and services.
- It relies on the features of Linux containers to run heterogeneous applications without knowing any internal details of these applications and without having to manually deploy these applications on each host.
- Kubernetes enables us to run our software applications on thousands of computer nodes as if all those nodes were a single, enormous computer. Kubernetes exposes the whole data-center as a single deployment platform.
- Deploying applications through Kubernetes is always the same, whether your cluster contains only a couple of nodes or thousands of them. The size of the cluster makes no difference at all.
-
Kubernetes can be thought of as an operating system for the cluster.
Bird’s-eye view of Kubernetes:
- A system is composed of a master node and any number of worker nodes.
- When the developer submits a list of apps to the master, Kubernetes deploys them to the cluster of worker nodes.
- It does not really matter where apps are deployed(on which worker nodes) unless developer specify specify that certain apps must run together and Kubernetes will deploy them on the same worker node.

|
Kubernetes exposes the whole datacenter as a single deployment platform. |
How Kubernetes helps developer and Ops team?
- Kubernetes provides infrastructure-related service, developer does not need to implement certain infrastructure-related services(like service discovery, scaling, load-balancing, self-healing, and even leader election) into their apps; instead they rely on Kubernetes to provide these services.
- Kubernetes will run your containerized app somewhere in the cluster,it helps to achieve far better resource utilization than is possible with manual scheduling by ops team.
Kubernetes cluster components
-
At high level Kubernetes cluster is made up of Master(Control Plane) and
worker nodes.
-
Control Plane controls the cluster and anchors its
functioning. It consists of multiple components that can run on a single
master node or be split across multiple nodes and replicated to ensure high
availability. Control plane consist of following components:
-
Kubernetes API Server: It act as single point of
interaction, submit add descriptor by developer and interact with
another control place in distributed environment.
- Controller Manager: Performs cluster-level functions, such as replicating components, keeping track of worker nodes, handling node failures
- Scheduler: Assigns a worker node to each deployable component of application.
- etcd: A distributed data store that stores the cluster configuration.
-
Kubernetes API Server: It act as single point of
interaction, submit add descriptor by developer and interact with
another control place in distributed environment.
-
The components of the Control Plane control the state of the cluster, but
they don’t run applications/services, it is done by the (worker)
nodes
-
Worker nodes are the machines that run your containerized
applications. The task of running, monitoring, and providing services to
applications is done by the worker nodes components. Worker nodes consist of
following components:
- Container runtime: It runs container, most commonly used container runtime software are Docker or rkt.
- Kubelet: It talks to the API server and manages containers on its node.
- Kubernetes Service Proxy (kube-proxy): It load-balances network traffic between application components.

|
|
Multi-node Kubernetes cluster setup - Google Kubernetes Engine (GKE) cluster
In real world, Kubernetes clusters are multi-node cluster. Setting up a
full-fledged, multi-node Kubernetes cluster isn’t a simple task, for
demonstration and learning we will Google Kubernetes Engine and spin up
multi-node cluster. Follow below steps to setup GCP account and setup
multi-node cluster.
GCP Reference.
Kubernetes Engine, which is a hosted and managed deployment of Kubernetes that runs on Google Cloud Platform (using Compute Engine instances under the hood).
-
If you do not have account setup in Google Cloud Platform(GCP), Go to
Google console and setup an
account. Please note in order to access Google Kubernetes Engine(GKE) -we
have to provide CC details(Google will not charge immediately). Its Free for an year, if you have not used it go ahead, else create a new email and setup.
-
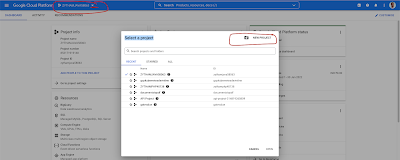
Create a project, I have used name: gcpkubernetesdevinline.
Project selector reference
-
Add billing details to this project.
Billing enable reference
-
Launch Cloud Shell - Go to
Google Cloud Console
and from the upper-right corner of the console, click the
Activate Cloud Shell button
-
Set default settings for the gcloud tool: Run below
commands in Cloud Shell Terminal(opened in step 4).
nikhilranjan234@cloudshell:~ (gcpkubernetesdevinline)$ gcloud config set compute/zone us-west1-a
Updated property [compute/zone].
API [compute.googleapis.com] not enabled on project [4118728221].
Would you like to enable and retry (this will take a few minutes)? (y/N)?  y
Enabling service [compute.googleapis.com] on project [4118728221]...
Operation "operations/acf.p2-4118728221-06e1ba2d-32c2-44b5-9b75-7784977588d0" finished successfully.
nikhilranjan234@cloudshell:~ (gcpkubernetesdevinline)$ gcloud config set compute/region us-west1
Updated property [compute/region].
-
Enable service: container.googleapis.com:
nikhilranjan234@cloudshell:~ (gcpkubernetesdevinline)$ gcloud services enable container.googleapis.com Operation "operations/acf.p2-4118728221-f58bb66d-1c8f-4df2-b43e-22f6e1bafe07" finished successfully. -
Create clusters in GKE :
Create 3 node cluster and Verify number of nodes running. Use kubectl command now to list all the nodes in your cluster.nikhilranjan234@cloudshell:~ (gcpkubernetesdevinline)$ gcloud container clusters create gkekubedevinline --num-nodes 3 Default change: VPC-native is the default mode during cluster creation for versions greater than 1.21.0-gke.1500. To create advanced routes based clusters, please pass the `--no-enable-ip-alias` flag Note: Your Pod address range (`--cluster-ipv4-cidr`) can accommodate at most 1008 node(s). Creating cluster gkekubedevinline in us-west1-a...done. Created [https://container.googleapis.com/v1/projects/gcpkubernetesdevinline/zones/us-west1-a/clusters/gkekubedevinline]. .... kubeconfig entry generated for gkekubedevinline. NAME: gkekubedevinline LOCATION: us-west1-a MASTER_VERSION: 1.21.6-gke.1500 MASTER_IP: 35.197.1.192 MACHINE_TYPE: e2-medium NODE_VERSION: 1.21.6-gke.1500 NUM_NODES: 3 STATUS: RUNNING
nikhilranjan234@cloudshell:~ (gcpkubernetesdevinline)$ kubectl get nodes NAME STATUS ROLES AGE VERSION gke-gkekubedevinline-default-pool-5f9f2c9a-850w Ready 5m39s v1.21.6-gke.1500 gke-gkekubedevinline-default-pool-5f9f2c9a-dr8b Ready 5m40s v1.21.6-gke.1500 gke-gkekubedevinline-default-pool-5f9f2c9a-vbrc Ready 5m40s v1.21.6-gke.1500Kubernetes cluster with 3 worker nodes
- Each worker node runs Docker, the Kubelet and the kube-proxy.
-
We(from outside K-cluster) will interact with the cluster through the
kubectl command line client, which issues REST requests to the
Kubernetes API server running on the master node.
-
Deploy an application in cluster:
We can use any container image to deploy in Kubernetes cluster. Here I am using nodejsapp container image which have created and publish in remote repository, refer Setup Docker, build docker image and push to Image registry
nikhilranjan234@cloudshell:~ (gcpkubernetesdevinline)$ kubectl create deployment nodeapp-server --image=zytham/nodejsapp
deployment.apps/nodeapp-server created
Another way to deploy app in kubernetes cluster is to use the kubectl run command like: kubectl run nodeapp-server --image=zytham/nodejsapp --port=8080 --generator=run/v1
-
Expose application as service:
In order to access deployed nodejs application from web-browser/outside GCP environment, we have to expose this as service (having external static IP address).
nikhilranjan234@cloudshell:~ (gcpkubernetesdevinline)$ kubectl expose deployment nodeapp-server --type LoadBalancer
--port 80 --target-port 8080
service/nodeapp-server exposed
-
Access pods and service details :
nikhilranjan234@cloudshell:~ (gcpkubernetesdevinline)$ kubectl get pods NAME READY STATUS RESTARTS AGE nodeapp-server-569df4c455-dpjp6 1/1 Running 0 87s nikhilranjan234@cloudshell:~ (gcpkubernetesdevinline)$ kubectl get service nodeapp-server NAME TYPE CLUSTER-IP EXTERNAL-IP PORT(S) AGE nodeapp-server LoadBalancer 10.76.6.106 35.185.207.79 80:31823/TCP 108s nikhilranjan234@cloudshell:~ (gcpkubernetesdevinline)$ kubectl get services NAME TYPE CLUSTER-IP EXTERNAL-IP PORT(S) AGE kubernetes ClusterIP 10.76.0.1
443/TCP 19m nodeapp-server LoadBalancer 10.76.6.106 35.185.207.79 80:31823/TCP 3m32s -
Access application:
n0r0082@m-c02z31rnlvdt ~ % curl http://35.185.207.79:80
You've hit nodeapp-server-569df4c455-dpjp6


GKE Resource Cleanup
To avoid incurring charges to your Google Cloud account for the resources
used.
-
Delete "nodeapp-server" service and "nodeapp-container" cluster from
GKE environment.
nikhilranjan234@cloudshell:~ (gcpkubernetesdevinline)$ kubectl delete service nodeapp-server
service "nodeapp-server" deleted

nikhilranjan234@cloudshell:~ (gcpkubernetesdevinline)$ gcloud container clusters delete nodeapp-container
The following clusters will be deleted.
 - [nodeapp-container] in [us-west1-a]
-
Go to application from Google console and click on Billing account and
disable billing for project.

Do not forget to remove billing otherwise you will charged and you will receive something like.. My trial has been expired.

Relationship between Kubernetes nodes, pods and containers
- Kubernetes pods are logical collection of co-related/co-located containers. Kubernetes does not allows accessing individual container but accessing pods are allowed.
- Pods are atomic unit in Kubernetes.
- A pod is a group of one or more tightly related containers that will always run together on the same worker node and in the same Linux namespace(s).
- Each pod is like a separate logical machine with its own IP, hostname, processes, and so on, running a single application.
- All the containers in a pod will appear to be running on the same logical machine.
- "kubectl get containers" is not valid command as Kubernetes does not allows accessing individual container.
- Kubernetes worker nodes are physical or virtual machine which does run one or more containers in it.
Containers, pods, and physical worker nodes relationship

Benefits of using Kubernetes
- Simplifying application development:
- Application runs in the same environment both during development and in production(application and its dependent resources are packaged as container image); it makes easier to sport any error locally.
- Kubernetes can automatically detect if the new version of application is in bad state and stop its rollout immediately.
- Simplifying application deployment:
- Kubernetes exposes all its worker nodes as a single deployment platform, application developers can start deploying applications on their own and don’t need to know anything about the servers that make up the cluster.
- Better hardware utilization:
- The ability to move applications around the cluster at any time allows Kubernetes to utilize the infrastructure much better than what you can achieve manually.
- When we tell Kubernetes to run any application, we are letting it
choose the most appropriate node to run the application on based on the
description of the application’s resource requirements and the
available resources on each node.
- Health checking and self-healing:
- Kubernetes monitors your app components and the nodes they run on and automatically reschedules them to other nodes in the event of a node failure.
- Automatic scaling
- Kubernetes can even automatically scale the whole cluster size up or down based on the needs of the deployed applications.
Reference: Kubernetes in Action By Marko Lukša
That means trouble for on line casino games, that have relied on performance marketing to draw and re-engage 카지노 사이트 the whale players. IPs and celebrities have already been utilized by on line casino firms and we will see more of that going down in 2022. Casino Games will continue to combine features which might be} designed to appeal to players from other genres, significantly puzzle and casual. These features embrace the likes of explorable hub worlds, properties, and other customized design areas. Overall, we will to} expect Casino Games to be considerably of an incubator for a puzzle or skill-based mini-games. Mini-games often happen of reward assortment stages, which happen after a player has engaged with the precise Casino Games.
ReplyDelete83CBD7FAE3
ReplyDeletekiralık hacker
hacker arıyorum
belek
kadriye
serik
ReplyDeleteSosyal medya hesaplarınızın daha hızlı ve etkili büyümesini sağlamak için güvenilir bir smm panel kullanmanız önemlidir. Bu panel sayesinde takipçi ve beğeni artırma işlemlerini kolayca gerçekleştirebilirsiniz. Güvenilirliği ve uygun fiyatlarıyla öne çıkan smm panel ile sosyal medya başarınızı artırabilirsiniz.